Monday, 11/14/22 - Rotoscoping
What is ROTOSCOPING?
Rotoscoping is where live actors are filmed and the animation is then created using them as a template. In traditional animation production, the filmed images are traced by hand onto a separate roll of celluloid film. This technique makes the movement of characters more realistic and was used in Walt Disney’s Snow White and the Seven Dwarfs (1937).
When you use actual VIDEO as a reference, you can trace frame by frame to create VERY impressive movement.
When you use actual VIDEO as a reference, you can trace frame by frame to create VERY impressive movement.
You need to learn how to use your tools efficiently - rotoscopes can take a considerable amount of hands-on time!
Follow this video and the instructions below to complete this assignment
VIDEO TUTORIAL: Creating a ROTOSCOPE with Wick Editor
REQUIREMENTS:- Technical Specifications
- 500 x 500 pixel size
- 24 FPS
- Animated GIF format
- NAME file properly: FIRSTNAME_Rotoscope1
- Effectiveness
- Clear Illustration
- Temporal Resolution - enough unique frames drawn to create believable motion
- Creativity
- Smooth Seamless Looping
- Initial Frame would make a good static avatar
- Technical Specifications
- 500 x 500 pixel size
- 24 FPS
- Animated GIF format
- NAME file properly: FIRSTNAME_Rotoscope1
- Effectiveness
- Clear Illustration
- Temporal Resolution - enough unique frames drawn to create believable motion
- Creativity
- Smooth Seamless Looping
- Initial Frame would make a good static avatar
DUE DATES: (-5pts for every day late)
3 MINOR GRADES & 1 MAJOR
- MONDAY, 11/14: Film Video and Upload to Google Assignment (Minor Grade)
- TUES. 11/15 : Convert Video to Stills in https://ezgif.com/video-to-jpg (Minor Grade)
- Save to your Google Drive
- Begin working in Wick Editor App (instructions above)
- WEDS. 11/16: EXPORT VIDEO (in Wick Editor) of your progress (Minor Grade) even if you are not done.
- Continue working on illustrations
- Friday, 11/18: FINAL GIF DUE (MAJOR GRADE)
Instructions:
- RECORD a 10 second video of human motion - ideally YOURS so that you can use the animation as an avatar later - try to create a "seamless loop" (Check your Cellphone Settings BEFORE you shoot! SEE INSTRUCTIONS BELOW)
- Use the instructions below to prepare and import your video into the Wick Editor as a REFERENCE layer
- Follow the appropriate instructions to Trace over "Key Frames" with the BRUSH tool, then hide the reference layer and export your Rotoscope as an Animated GIF
TIPS:
- Try a SIMPLE, SHORT test BEFORE you commit to your main project VIDEO
- Keep your camera steady - rest it on a stable surface, tripod, or stand
- Think of movement that will result in a creative, expressive, and seamless loop ANIMATION
- Choose Significant "keyframes" to illustrate first, then go back to fill in the tweens to add extra detail to the movement
- Keep it SIMPLE - Hair, Eyes, Eyebrows, Mouth, Nostrils; Just use blobs, not fine lines!
- TAKE A BREAK - SAVE OFTEN - use UNDO when you need to. Get up, walk away and come back to it!
How to Convert Video to Stills for the Wick Editor App
- Shoot your reference video in a short, low res format ie on your laptop or mobile device. Transfer the file to your computer using Google Drive.
- Convert the video into individual image frames using a utility like https://ezgif.com/video-to-jpg
- Upload an MP4, MKV or MOV file
- Set the appropriate START TIME and END TIME so that you just convert the part that you need
- Set the SIZE to AUTOx480 and the FRAME RATE to 20 FPS
- Click CONVERT and images will start to appear
- SCROLL DOWN to the bottom to download the packaged images as a ZIP file
- Open the ZIP file, then DRAG or COPY the images to an appropriate folder on your computer, or in Windows Explorer, Right Click the Zip folder and Select EXTRACT ALL
- Create a new Wick Editor project sized to 450x450 pixels and 24fps
- UPLOAD the images into Wick as reference graphics, and add only the first couple of images. Name that layer "Reference" -
- Create another layer called "Guidelines" above the reference layer, and draw guidelines there to help you line up your images as you drag them into the reference layer.
- Now continue drag reference images to new keyframes and line them up with your guidelines.
- Lock the reference layer, hide the guideline layer, and Create a final layer for you to start sketching in!
VIDEO TUTORIAL: Converting Video to Stills and Rotoscoping in the Wick Editor App
How to SET UP your phone
- RESOLUTION: Look under your camera settings, and try to set it to a low resolution no more than 1080p (1920x1080 pixels) - you DON'T want the files to get too big! DON'T use 4K or 60fps!
- AVOID HEVC: IF you have an iPHONE, there is a troublesome movie format called HEVC that can cause problems in editing. iPhone users should check their settings BEFORE THEY SHOOT to avoid this format. Here's how:
- Go to Settings > Camera.
- Tap Formats.
- Tap Most Compatible. This setting is available only on devices that can capture media in HEIF or HEVC format, and only when using iOS 11 or later.
- Use the proper TECHNIQUES
- Pay attention to the background
- Frame in LANDSCAPE orientation just above the head to just below the chest
- Shoot outdoors for better LIGHTING, and pivot to see what light angle (and background) looks best
- Look directly into the lens
- Find a QUIET location, and consider using your earbuds as a microphone
- Transfer the files
- Install the GOOGLE DRIVE app on your phone
- From your phone's photo album, select a video clip and click the SHARE icon. You should see the Google Drive icon as a destination
- Specify which account, which drive folder, and what filename you'd like to send the file to.
- Make it easy to find - create a new folder called UPLOADS
- Go to Settings > Camera.
- Tap Formats.
- Tap Most Compatible. This setting is available only on devices that can capture media in HEIF or HEVC format, and only when using iOS 11 or later.
- Pay attention to the background
- Frame in LANDSCAPE orientation just above the head to just below the chest
- Shoot outdoors for better LIGHTING, and pivot to see what light angle (and background) looks best
- Look directly into the lens
- Find a QUIET location, and consider using your earbuds as a microphone
- Install the GOOGLE DRIVE app on your phone
- From your phone's photo album, select a video clip and click the SHARE icon. You should see the Google Drive icon as a destination
- Specify which account, which drive folder, and what filename you'd like to send the file to.
- Make it easy to find - create a new folder called UPLOADS
_________________________________________________________________________
Assignment #2: CHEESEBURGER, Cheeseburger, Cheeseburge
Make a cheeseburger using shapes and colors. You have today and tomorrow to complete this assignment.- Open Adobe Illustrator
- Click FILE, New
- On the NEW DOCUMENT SCREEN
- Name: YourFirstName_Burger
- New Doc Profile: PRINT
- Size: Letter
- CLICK - OK
- Now using any tool you can figure out - play around with Illustrator and create a cheeseburger.
- Use Layers to place the layers of your cheeseburger in order
- Include the usual's like cheese, lettuce and tomato, bacon or any toppings you like
- give your bun/bread interest, maybe it has seeds or its toasted
- use shadows and shading to make your cheeseburger look amazing
- "you want fries with that?" feel free to get creative
- SAVE! Save regularly, in case your program crashes you don't lose all your work
- FILE > SAVE > save on your desktop
- WHEN DONE, Export as a PNG file
- click FILE
- Click EXPORT
- click the desktop icon,
- on bottom drop menu (SAVE as type) select, PNG
- click use artboards
- click SAVE
- Upload your Cheeseburger to the blog - This is your first official blog/portfolio post
- Upload your PNG to the Google Assignment for a grade
-------------------------------
Make a cheeseburger using shapes and colors.
You have today and tomorrow to complete this assignment.
- Open Adobe Illustrator
- Click FILE, New
- On the NEW DOCUMENT SCREEN
- Name: YourFirstName_Burger
- New Doc Profile: PRINT
- Size: Letter
- CLICK - OK
- Now using any tool you can figure out - play around with Illustrator and create a cheeseburger.
- Use Layers to place the layers of your cheeseburger in order
- Include the usual's like cheese, lettuce and tomato, bacon or any toppings you like
- give your bun/bread interest, maybe it has seeds or its toasted
- use shadows and shading to make your cheeseburger look amazing
- "you want fries with that?" feel free to get creative
- SAVE! Save regularly, in case your program crashes you don't lose all your work
- FILE > SAVE > save on your desktop
- WHEN DONE, Export as a PNG file
- click FILE
- Click EXPORT
- click the desktop icon,
- on bottom drop menu (SAVE as type) select, PNG
- click use artboards
- click SAVE
- Upload your Cheeseburger to the blog - This is your first official blog/portfolio post
- Upload your PNG to the Google Assignment for a grade
-------------------------------
Assignment #1: PATHFINDER TOOL Tutorial
INSTRUCTIONS:
- Open Adobe Illustrator
- FILE> NEW > LETTER
- Go to WINDOWs > Select Pathfinder
- Follow steps below (You can create all steps on the same page)
- EXPORT as a Jpeg
- Label: FirstName_Pathfinder
- Post to the Google Classroom Assignment for a MINOR Grade
STEPS:
Starting with pretty basic shapes in Illustrator can end up in quite complex and interesting layouts. If you combine ellipses, rectangles and other lines you can produce complicated paths otherwise impossible (or I would rather say extremely time consuming) to achieve with the Pen tool alone. The tool needed for doing that is the Pathfinder Panel.
If we take a look at the panel we see that there are two rows of icons. The first row of icons (Shape Modes) creates compound shapes while the second one (Pathfinders) creates similar results but it focuses mainly on the paths themselves rather than the produced shape itself. Let’s see what each icon is doing.
a. Add to shape area

Supposing you have the following two rectangles.

If you select both and click on this button in fact you are adding the one shape to the other resulting in a shape that combines these two rectangles.
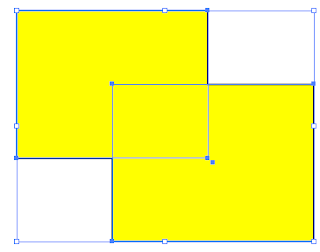
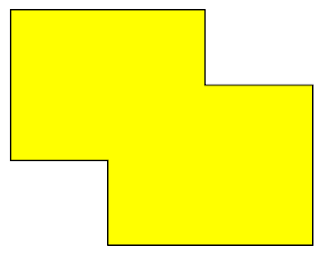
The combined result gets a yellow fill, since stacking order of the shapes is important when performing the pathfinder operations. Attributes of the top shape will be used by Illustrator for the combined result properties. By using the direct selection tool
 you can make adjustments of each one of the two shapes directly updating the resulting compound shape. For example, try moving the lower right rectangle further to the right as seen below.
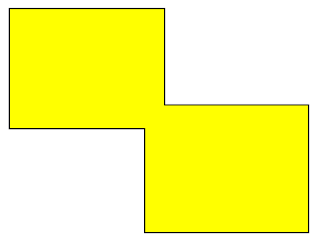
No problem… You still have the resulting shape, while you can modify each of its components individually… Cool! If you now select your shapes and click on the Expand button on the Pathfinder Panel
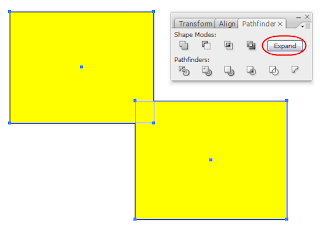
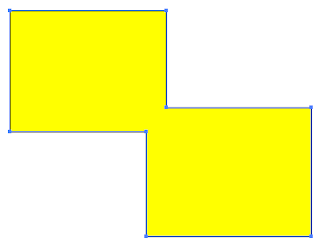
you no longer have the ability to separately manipulate each individual shape and what you get is ONE FINAL shape for further actions. If you want to add the two shapes and expand to one final shape in one step, then press and hold the ALT key and click on the add button. It saves you time, as long as you are sure about the final shape.
b. Subtract from Shape Area

Let’s go back to our two initial rectangles.
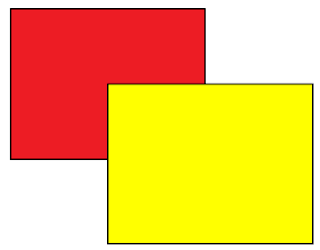
If you select both and click on the Subtract button, then you subtract the top most shape from what lies beneath it. So if you perform the operation you get the following result.
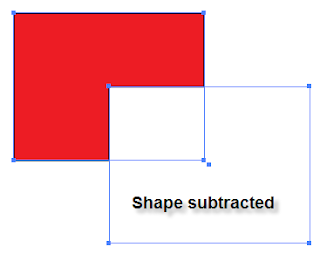
Like before, you can adjust the appearance of the resulting shape by editing each one of the components separately. Here, with the direct selection tool I’ve moved the subtracted shape diagonally towards the upper left corner.
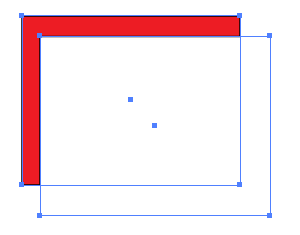
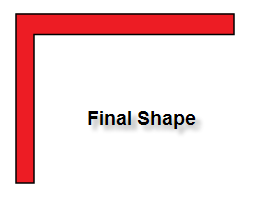
Click on the expand button and you get the final ONE shape.
c. Intersect shape areas

If we select the two rectangles again, and click on the Intersect button, we get a compound shape that is only the Intersecting area of the two rectangles. Click on the expand button and you produce a small yellow rectangle.
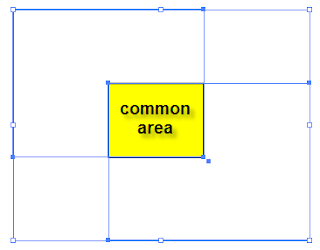
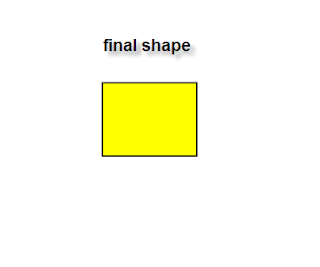
d. Exclude overlapping shape areas

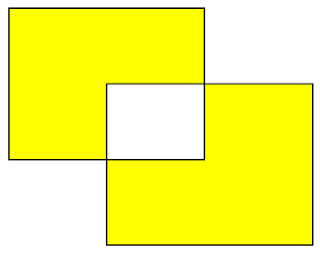
If we click on the exclude button, then we get the inverse result. We have a shape with an empty area. This area is the overlapping area of both rectangles. Do it and you’ll end up with the following shape.
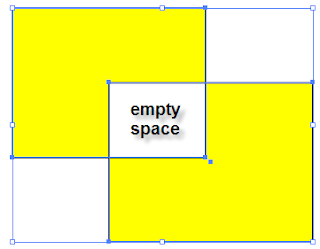
Post to the Google Classroom Assignment for a MINOR Grade
______________________________________________
How to Set-up Your Folder in Google Drive
I WILL NOT grade documents that are labeled incorrectly or in the wrong folder.
- In your Google Drive, click NEW and select FOLDER
- Name your folder : FIRSTNAME LASTNAME GDesign2022
- Select your new folder
- Within that folder, click NEW and select FOLDER
- Create 5 new folders labeled:
- Do Now’s
- Major Assignments
- Minor Assignments
- Misc Files
- Inside your DO NOW’s folder, create Google Document named:
- ABOUT ME_FIRSTNAME LAST NAME
- Inside your MINOR folder, create Google Document named:
- PRINCIPLES OF DESIGN WS_FIRSTNAME LAST NAME
- Inside your MAJOR folder, create Google Document named:
- GOLDEN RATIO_FIRSTNAME LAST NAME
- Return to your Google Drive
- Select the Folder labeled: FIRSTNAME LASTNAME GDesign2022
- Right click and select SHARE
- Input me email address: vivianna.acuna-francisco@wtsdnj.com
- Be sure it says CAN EDIT
This will give me access to your Graphic Design files only.


No comments:
Post a Comment