Walking Sequence Animation
MRS. A's TUTORIAL:
Follow the instructions below carefully. Go Step by Step.
I have also created a Tutorial for you to follow. (see first video above)Step by step instructions are posted BELOW the REQUIREMENTS section of the instructions.
Watch my Tutorial and then READ the Instructions before you begin your Animation.
Watch my Tutorial and then READ the Instructions before you begin your Animation.
SEE REFERENCE FILES posted on Google Classroom
INSTRUCTIONS:
- Create your Assets (body parts) in Vectr.com using the Character you have already created in Adobe Illustrator(the one you will be using from your storyboard)

3. Select each section by dragging the cursor around the items you are going to make into a PNG (upper leg, lower leg, right upper arm, etc.)Click EXPORT > SELECTION > PNG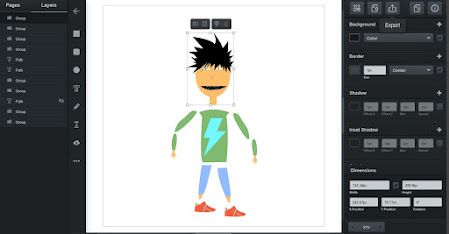
3. Repeat for each of your Character's body parts. Example: Lower Leg.png; Upper Leg; Upper Arm.png; Lower Arm.png, etc.

4. Once you download all your components put all the files in one folder and name the Folder: Name_BODY PARTS
5. Save your Vectr.com file in case you need to go back to it.
Basically, you will be setting up your animation like you set up your stick figure animation.
- Make sure that you have clicked SELECTION option (NOT PAGE) under the little gray arrow and SELECT > PNG
- Click DOWNLOAD
- REPEAT for each part of your Character

4. Once you download all your components put all the files in one folder and name the Folder: Name_BODY PARTS

5. Save your Vectr.com file in case you need to go back to it.
NEXT.....
1. Open the Wick Editor AppBasically, you will be setting up your animation like you set up your stick figure animation.
- Create a NEW File Go to the EDITOR SETTINGS in the upper right-hand corner (looks like a spiky circle) (See Video TUTORIAL below)
- SELECT 720 (Standard Youtube video Size) > Click APPLY

- Create a NEW LAYER (this will be your Background) Remember to keep this layer behind all your movements.
- Drag the frame ending to make it as long as your whole video
- Import a BACKGROUND image as an assetI imaged searched a classroom cartoon, you can draw a background or find something that works for you from the internet
- Make sure it doesn't have any watermarks on it.
- TO ADD YOUR BACKGROUND IMAGE:Go to the Assets Window (See image above)
- Click the Square with the ARROW pointing UP to Add your assets (background image and all the body parts in the folder)
- GO TO your Background layer > DRAG the asset from the Asset Panel into that folder frame
- Resize it as needed.
- Create another LAYER, Name it Movements (see Mrs. A's Tutorial Video) Move this Layer ABOVE the Background Layer
- ADD a NEW FRAME - make it 2 frames long by dragging the little box over 2 frames
- Arrange your body parts into your first positionDrag your body parts from the Asset panel and move into your desired location
- Your first movement should start off the page
- ADD a new frame
- SELECT this FRAME you just made > DUPLICATE (Ctrl + D)This will make an exact duplicate of the frame, or
- Make a NEW frame by clicking the empty box next to your current frame, expand it so it is 2 frames long
- Go back to your PREVIOUS FRAME > SELECT ALL (Ctrl + A)
- COPY (Ctrl + C)
- Go to the NEW FRAME you just made and PASTE (Ctrl + P)
- In this new FRAME with your duplicate CharacterMove the Character over slightly and adjust the body parts to create the 2nd movement of a walking sequenceSELECT ALL (Ctrl + A) and using the arrow keys on your keyboard, move it over slightly
- Use the onion skin option so you can see your previous frame.
- Adjust your individual Body parts
- CREATE a NEW FRAME (by duplicating the frame or by creating a new frame like above) and adjust your Character's body parts to make the next movement
- REPEAT - REPEAT for Every Movement (see Reference for Walking Sequence in your Google Classroom)
- You will create a FRAME for every movement until your character walks around your background (I had about 38 frames)
- Follow the reference images for walking from one side to another or walking forward (located in Google Classroom)
- You can also "Turn" your character and have it walk towards you (See Mrs. A.'s video tutorial)
- Check and recheck your timeline to make sure that everything is flowing the way it's supposed to
- Go back and adjust any steps you missed
- SAVE regularly so if your computer or the software crashes you don't lose your work
- Add music to your video by uploading an MP3 to your asset panel
- Go to your BACKGROUND LAYER
- Drag your MP3 onto that layer - your music will play for the duration of your background
- SAVE your WICK file and upload to your Google Drive
- EXPORT as a VIDEO (mp4) and post in the Google Assignment
- Please make your animation longer if you'd like. Around 10 seconds for your final video will be good.
- My video was about 7 seconds.

- Background (you can draw it or download from the internet)
- Minimum of 7-10 secs of a walking sequence
- MUST DEMONSTRATE and Follow the basic walking sequence (arms and legs move at the joint, feet change position, the body goes up and down, etc.)

- Must have music
- BE CREATIVE!!
- Based on your original story board idea
- DUE: Monday 10/24
MAJOR GRADE (- 5pts for every day late)


No comments:
Post a Comment